Blog Home Page
Let’s create the home page displaying your recent posts.
Before we start, you should know at least some basics about the Model-View-Presenter design pattern (similar to MVC):
- Model – the layer working with data. It is completely separated from the rest of the application. It only communicates with the presenter.
- View – the front-end layer. It renders requested data using templates and displays it to the user.
- Presenter (or Controller) – the connection layer. The presenter connects the Model and the View. It handles requests, asks the Model for data, and then passes them to the View.
In the case of a simple application like our blog, the entire model layer will consist only of database queries – we don't need any extra PHP code for that yet. So, for starters, we will only create presenters and templates. In Nette, each presenter has its own templates, so we will create them simultaneously.
Creating the Database with Adminer
To store the data, we will use a MySQL database because it is the most common choice among web developers. However, if you don't want to use it, feel free to choose a database of your choice.
Let’s prepare the database structure which will store our blog posts. We can start very simply – just with a single table for posts.
To create the database, we can download Adminer, or use another database management tool you prefer.
Let’s open Adminer and create a new database called quickstart.
Create a new table named posts and add these columns:
idint, check autoincrement (AI)titlevarchar, length 255contenttextcreated_attimestamp
It should look like this:
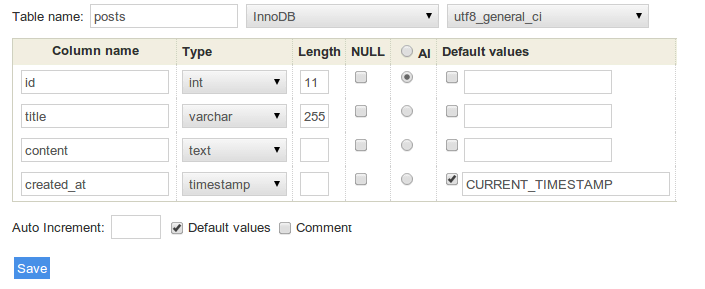
CREATE TABLE `posts` (
	`id` int(11) NOT NULL AUTO_INCREMENT PRIMARY KEY,
	`title` varchar(255) NOT NULL,
	`content` text NOT NULL,
	`created_at` timestamp NOT NULL DEFAULT CURRENT_TIMESTAMP
) ENGINE=InnoDB CHARSET=utf8;
It’s very important to use the InnoDB storage engine. You will see the reason later. For now, just choose it and click Save.
Try adding some sample blog posts manually before we implement adding new posts directly from our application.
INSERT INTO `posts` (`id`, `title`, `content`, `created_at`) VALUES
(1,	'Article One',	'Lorem ipusm dolor one',	CURRENT_TIMESTAMP),
(2,	'Article Two',	'Lorem ipsum dolor two',	CURRENT_TIMESTAMP),
(3,	'Article Three',	'Lorem ipsum dolor three',	CURRENT_TIMESTAMP);
Connecting to the Database
Now that the database is created and we have some posts in it, it’s the right time to display them on our brand new page.
First, we need to tell our application which database to use. The database connection configuration is set in the
config/common.neon file using DSN and credentials. It should look
something like this:
database:
	dsn: 'mysql:host=127.0.0.1;dbname=quickstart'
	user: *enter your username here*
	password: *enter your database password here*
Be careful with indentation while editing this file. The NEON format accepts both spaces and tabs, but not both together. The default configuration file in the Web Project uses tabs.
Injecting the Database Connection
The presenter HomePresenter, which will list the posts, needs a database connection. To receive it, we'll use the
constructor like this:
<?php
namespace App\Presentation\Home;

use Nette;

final class HomePresenter extends Nette\Application\UI\Presenter
{
	public function __construct(
		private Nette\Database\Explorer $database,
	) {
	}

	// ...
}
Loading Posts from the Database
Now let’s fetch the posts from the database and pass them to the template, which will then render the HTML code. This is what the so-called render method is for:
public function renderDefault(): void
{
	$this->template->posts = $this->database
		->table('posts')
		->order('created_at DESC')
		->limit(5);
}
The presenter now has one render method renderDefault(), which passes data from the database to the template
(View). Templates are located in app/Presentation/{PresenterName}/{viewName}.latte, so in this case, the template is
located in app/Presentation/Home/default.latte. In the template, a variable named $posts is now
available, containing the posts fetched from the database.
Template
For the entire website, we have a main template (called layout, containing the header, styles, footer, …) and specific templates for each view (e.g., for displaying blog posts), which can override parts of the main template.
By default, the layout template is located in app/Presentation/@layout.latte and contains:
...
{include content}
...
The {include content} tag inserts a block named content into the main template. We will define this
block in the templates for individual views. In our case, we will modify the Home/default.latte file as follows:
{block content}
	Hello World
{/block}
This defines the content block, which will be inserted into the
main layout. If you refresh the browser again, you will see a page with the text “Hello World” (in the source code, also with
the HTML header and footer defined in @layout.latte).
Let’s display the blog posts – we will modify the template as follows:
{block content}
	<h1>My Blog</h1>

	{foreach $posts as $post}
	<div class="post">
		<div class="date">{$post->created_at|date:'F j, Y'}</div>

		<h2>{$post->title}</h2>

		<div>{$post->content|truncate:256}</div>
	</div>
	{/foreach}
{/block}
If you refresh your browser, you’ll see the list of your blog posts. The list isn't very fancy or colorful yet, so feel free
to add some nice CSS styles to the
www/css/style.css file and link it in the layout:
	...
	<link rel="stylesheet" href="{$basePath}/css/style.css">
</head>
...
The {foreach} tag iterates over all posts passed to the template in the $posts variable and displays
a piece of HTML code for each post. It behaves just like PHP code.
The |date: notation is called a filter. Filters are used to format the output. This particular filter converts a
date (e.g., 2013-04-12) to its more readable form (April 12, 2013). The |truncate filter
truncates the string to the specified maximum length and adds an ellipsis (…) to the end if the string is truncated. Since this
is a preview, there is no point in displaying the full content of the post. Other default filters can be found in the documentation, or you can create your own if needed.
One more thing. We can make the previous code shorter and simpler. We achieve this by replacing Latte tags with n:attributes:
{block content}
	<h1>My Blog</h1>

	<div n:foreach="$posts as $post" class="post">
		<div class="date">{$post->created_at|date:'F j, Y'}</div>

		<h2>{$post->title}</h2>

		<div>{$post->content|truncate:256}</div>
	</div>
{/block}
The n:foreach attribute wraps the div block with a foreach loop (it works exactly the same as the
previous code).
Summary
We now have a very simple MySQL database with a few posts. The application connects to this database and displays a simple list of these posts in a template.