Forms Rendering
Forms' appearances can differ greatly. In fact, there are two extremes. One side is the need to render a set of very similar forms all over again, with little to none effort. Usually administrations and back-ends.
The other side is tiny sweet forms, each one being a piece of art. Their layout can best be written in HTML. Of course, besides those extremes, there are many forms just in between.
Default Renderer
Renderer automatically renders a form. It's set with setRenderer() method on a form and it gains control when
calling $form->render(). If we set no custom renderer, Nette\Forms\Rendering\DefaultFormRenderer
is used. All you have to write is:
$form->render();
or in Latte:
{control form}
and the form is alive. All input fields are rendered into an HTML table. The output could look like this:
<table>
<tr class="required">
	<th><label class="required" for="frm-name">Name:</label></th>

	<td><input type="text" class="text" name="name" id="frm-name" value=""></td>
</tr>

<tr class="required">
	<th><label class="required" for="frm-age">Age:</label></th>

	<td><input type="text" class="text" name="age" id="frm-age" value=""></td>
</tr>

<tr>
	<th><label>Gender:</label></th>
	...
Nicely formatted, isn't it? :-)
It's up to you, whether to use a table or not, and many web designers prefer different markups, for example a list. We may
configure DefaultFormRenderer so it would not render into a table at all. We just have to set proper $wrappers. The
first index always represents an area and the second one it's element. All respective areas are shown in the picture:
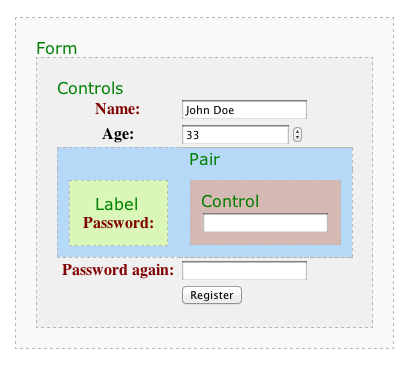
By default a group of controls is wrapped in <table>, and every pair is a table
row <tr> containing a pair of label and control (cells <th> and
<td>). Let's change all those wrapper elements. We will wrap controls into
<dl>, leave pair by itself, put label into <dt> and wrap
control into <dd>:
$renderer = $form->getRenderer();
$renderer->wrappers['controls']['container'] = 'dl';
$renderer->wrappers['pair']['container'] = null;
$renderer->wrappers['label']['container'] = 'dt';
$renderer->wrappers['control']['container'] = 'dd';

$form->render();
Results into the following snippet:
<dl>
	<dt><label class="required" for="frm-name">Name:</label></dt>

	<dd><input type="text" class="text" name="name" id="frm-name" value=""></dd>


	<dt><label class="required" for="frm-age">Age:</label></dt>

	<dd><input type="text" class="text" name="age" id="frm-age" value=""></dd>


	<dt><label>Gender:</label></dt>
	...
</dl>
Wrappers can affect many attributes. For example:
- add special CSS classes to each form input
- distinguish between odd and even lines
- make required and optional draw differently
- set, whether error messages are shown above the form or close to each element
Bootstrap Support
You can find examples of configuration forms for Twitter Bootstrap 2, Bootstrap 3 and Bootstrap 4
Latte
Templating engine Latte makes it much easier to render forms and their elements:
{form myForm}
<table>
<tr n:foreach="$form->controls as $name => $field">
	<th>{label $name /}<th>
	<td>{input $name}</td>
	<td n:ifcontent>{inputError $name}</td>
</tr>
</table>
{/form}
The {form} or <form n:name> tag starts rendering of given form. It also creates a local
variable $form with a form object. The closing {/form} or </form> tag renders all
undrawn hidden fields before completes the form.
{input} tag renders any element including select boxes and textareas. {label} is optionally paired
tag, ie. {label}Age{/label}, in that case the text is translated too. Tag {inputError} prints error
message for form input.
It's also possible to “breathe life” into a raw HTML input with n:name attribute tag, which links it with the
form input using its identification:
<form n:name=myForm>
	<p>Name: <input size="50" n:name="name"></p>
	<p>Password: <input size="30" n:name="password"></p>
</form>
If you only need to render the inner content of a form without <form> &
</form> HTML tags, for example, in an AJAX request, you can open and close the form with
{formContext formName} … {/formContext}. It works similarly to {form} in a logical sense, here it
allows you to use other tags to draw form elements, but at the same time it doesn't draw anything.
Code Proposal {formPrint}
You can also generate Latte code for a form using the {formPrint} tag. If you
place it in a template, the code of form is displayed instead of the normal template. Then simply select and copy the code into
your project.
Manual Rendering
You can render forms manually for better control over the generated code. Place the form inside {form myForm} and
{/form} pair tags. Inputs can be rendered using {input myInput} tag, which renders the input, and
{label myInput /}, which renders its the label.
{form signForm}

<!-- Simple errors rendering -->
<ul class="errors" n:if="$form->hasErrors()">
	<li n:foreach="$form->errors as $error">{$error}</li>
</ul>

<table>
<tr class="required">
	<th>{label name /}</th>
	<td>{input name}</td>
</tr>

<!--If you need to manually render a radiolist -->
<p>{input radioList:itemKey} | {input radioList:itemKeyTwo}</p>

...

</table>
{/form}
You can also connect a form with a template easily by using n:name attribute.
protected function createComponentSignInForm()
{
	$form = new Form;
	$form->addText('user')->setRequired();
	$form->addPassword('password')->setRequired();
	$form->addSubmit('send');
	return $form;
}
<form n:name=signInForm class=form>
	<p><label n:name=user>Username: <input n:name=user size=20></label>
	<p><label n:name=password>Password: <input n:name=password></label>
	<p><input n:name=send class="btn btn-default">
</form>
You can also use n:name with <select>, <button> or
<textarea> elements and the content.
You can render RadioList, Checkbox or CheckboxList by HTML elements individually. This is called partial rendering:
{foreach $form[gender]->items as $key => $label}
	<label n:name="gender:$key"><input n:name="gender:$key"> {$label}</label>
{/foreach}
Or you can use basic tags {input gender:$key} and {label gender:$key}. The trick is using the colon.
For a simple checkbox, use {input myCheckbox:}.
Tag formContainer helps with rendering of inputs inside a form container.
{form signForm}
<table>
	<th>Which news you wish to receive:</th>
	<td>
		{formContainer emailNews}
		<ul>
			<li>{input sport} {label sport /}</li>
			<li>{input science} {label science /}</li>
		</ul>
		{/formContainer}
	</td>
	...
</table>
{/form}
How to set more attributes to HTML elements? Methods getControl() and getLabel() return element as a
Nette\Utils\Html objects, which can be easily
adjusted. In Latte:
{form signForm class => 'big'}
<table>
<tr class="required">
	<th>{label name /}</th>
	<td>{input name cols => 40, autofocus => true}</td>
</tr>
Grouping Inputs
Input fields can be grouped into visual field-sets by creating a group:
$form->addGroup('Personal data');
Creating new group activates it – all elements added further are added to this group. You may build a form like this:
$form = new Form;
$form->addGroup('Personal data');
$form->addText('name', 'Your name:');
$form->addInteger('age', 'Your age:');
$form->addEmail('email', 'Email:');

$form->addGroup('Shipping address');
$form->addCheckbox('send', 'Ship to address');
$form->addText('street', 'Street:');
$form->addText('city', 'City:');
$form->addSelect('country', 'Country:', $countries);
HTML Attributes
You can set any HTML attributes to form controls using setHtmlAttribute(string $name, $value = true):
$form->addInteger('number', 'Number:')
	->setHtmlAttribute('class', 'bigNumbers');

$form->addSelect('rank', 'Order by:', ['price', 'name'])
	->setHtmlAttribute('onchange', 'submit()'); // calls JS function submit() on change


// applying on <form>
$form->getElementPrototype()->id = 'myForm';
$form->getElementPrototype()->target = '_top';
Setting input type:
$form->addText('tel', 'Your telephone:')
	->setHtmlType('tel')
	->setHtmlAttribute('placeholder', 'Please, fill in your telephone');
We can set HTML attribute to individual items in radio or checkbox lists with different values for each of them. Note the colon
after style: to ensure that the value is selected by key:
$colors = ['r' => 'red', 'g' => 'green', 'b' => 'blue'];
$styles = ['r' => 'background:red', 'g' => 'background:green'];
$form->addCheckboxList('colors', 'Colors:', $colors)
	->setHtmlAttribute('style:', $styles);
Renders:
<label><input type="checkbox" name="colors[]" style="background:red" value="r">red</label>
<label><input type="checkbox" name="colors[]" style="background:green" value="g">green</label>
<label><input type="checkbox" name="colors[]" value="b">blue</label>
For a logical HTML attribute (which has no value, such as readonly), you can use a question mark:
$colors = ['r' => 'red', 'g' => 'green', 'b' => 'blue'];
$form->addCheckboxList('colors', 'Colors:', $colors)
	->setHtmlAttribute('readonly?', 'r'); // use array for multiple keys, e.g. ['r', 'g']
Renders:
<label><input type="checkbox" name="colors[]" readonly value="r">red</label>
<label><input type="checkbox" name="colors[]" value="g">green</label>
<label><input type="checkbox" name="colors[]" value="b">blue</label>
For selectboxes, the setHtmlAttribute() method sets the attributes of the <select> element. If
we want to set the attributes for each <option>, we will use the method addOptionAttributes().
Also, the colon and question mark used above work:
$form->addSelect('colors', 'Colors:', $colors)
	->addOptionAttributes(['style:' => $styles]);
Renders:
<select name="colors">
	<option value="r" style="background:red">red</option>
	<option value="g" style="background:green">green</option>
	<option value="b">blue</option>
</select>
Other Setting
Setting description (rendered after the input by default):
$form->addText('phone', 'Number:')
	->setOption('description', 'This number will remain hidden');
If we want to place HTML content into it, we use Html class.
use Nette\Utils\Html;

$form->addText('phone', 'Phone:')
	->setOption('description', Html::el('p')
		->setHtml('This number remains hidden. <a href="...">Terms of service.</a>')
	);
Html element can be also used instead of label: $form->addCheckbox('conditions', $label).
Without Latte
Each element has getLabel() and getControl() methods which return HTML code of label and the element
itself. Nette provides getter and setter property access as if you are accessing the attribute itself.
<?php $form->render('begin') ?>
<?php $form->render('errors') ?>

<table>
<tr class="required">
	<th><?php echo $form['name']->label // Calls getLabel() ?></th>
	<td><?php echo $form['name']->control // Calls getControl()  ?></td>
</tr>

<tr class="required">
	<th><?php echo $form['age']->label ?></th>
	<td><?php echo $form['age']->control ?></td>
</tr>

// ...

</table>

<?php $form->render('end') ?>
Event onRender
Just before the form is rendered, we can have our code invoked. This can, for example, add HTML classes to the form elements
for proper display. We add the code to the onRender array:
$form->onRender[] = function ($form) {
	BootstrapCSS::initialize($form);
};