Forms in Presenters
Nette Forms significantly simplify the creation and processing of web forms. In this chapter, you will learn how to use forms inside presenters.
If you are interested in using them completely standalone without the rest of the framework, there is a guide for standalone usage.
First Form
Let's try writing a simple registration form. Its code will be as follows:
use Nette\Application\UI\Form;

$form = new Form;
$form->addText('name', 'Name:');
$form->addPassword('password', 'Password:');
$form->addSubmit('send', 'Sign up');
$form->onSuccess[] = $this->formSucceeded(...);
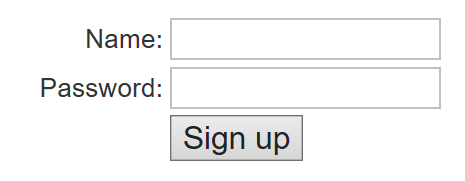
and in the browser, it will be displayed like this:
A form in a presenter is an object of the Nette\Application\UI\Form class; its predecessor
Nette\Forms\Form is intended for standalone use. We added controls named name, password, and a submit button.
Finally, the line $form->onSuccess states that after submission and successful validation, the method
$this->formSucceeded() should be called.
From the presenter's perspective, the form is a regular component. Therefore, it is treated as a component and integrated into the presenter using a factory method. It will look like this:
use Nette;
use Nette\Application\UI\Form;

class HomePresenter extends Nette\Application\UI\Presenter
{
	protected function createComponentRegistrationForm(): Form
	{
		$form = new Form;
		$form->addText('name', 'Name:');
		$form->addPassword('password', 'Password:');
		$form->addSubmit('send', 'Sign up');
		$form->onSuccess[] = $this->formSucceeded(...);
		return $form;
	}

	private function formSucceeded(Form $form, $data): void
	{
		// here we will process the data sent by the form
		// $data->name contains name
		// $data->password contains password
		$this->flashMessage('You have successfully signed up.');
		$this->redirect('Home:');
	}
}
And in the template, the form is rendered using the {control} tag:
<h1>Registration</h1>

{control registrationForm}
And that's basically everything :-) We have a functional and perfectly secured form.
Now you're probably thinking it was too fast, wondering how it's possible that the formSucceeded() method is
called and what parameters it receives. Yes, you're right, this deserves an explanation.
Nette introduces a refreshing mechanism called Hollywood style. Instead of you, as a developer, having to constantly ask if something happened (‘was the form submitted?’, ‘was it submitted validly?’, and ‘was it not forged?’), you tell the framework ‘when the form is validly filled, call this method’ and leave the subsequent work to it. If you program in JavaScript, you are intimately familiar with this style of programming. You write functions that are called when a certain event occurs. And the language passes the appropriate arguments to them.
This is precisely how the presenter code above is constructed. The $form->onSuccess array represents a list of
PHP callbacks that Nette calls the moment the form is submitted and correctly filled (i.e., it is valid). Within the presenter life cycle, this is a so-called
signal, so they are called after the action* method and before the render* method. And to each callback,
it passes the form itself as the first parameter and the submitted data as an ArrayHash object (or stdClass, or a custom class) as the second.
You can omit the first parameter if you don't need the form object. The second parameter can be smarter, but more on that later.
The $data object contains the name and password properties with the data entered by the
user. Usually, we send the data directly for further processing, which might be, for example, insertion into a database. However,
an error might occur during processing, for instance, the username is already taken. In such a case, we pass the error back to the
form using addError() and let it be rendered again, along with the error message.
$form->addError('Sorry, username is already in use.');
Besides onSuccess, there is also onSubmit: callbacks are called whenever the form is submitted, even
if it is not filled correctly. And also onError: callbacks are called only if the submission is not valid. They are
even called if we invalidate the form in onSuccess using addError().
After processing the form, we redirect to another page. This prevents the unwanted resubmission of the form by using the refresh, back button, or navigating through browser history.
If the form is submitted over AJAX, you usually redraw a snippet with the re-rendered form instead of redirecting.
Try adding other form controls.
Access to Controls
The form is a component of the presenter, in our case named registrationForm (after the factory method name
createComponentRegistrationForm), so anywhere in the presenter, you can access the form using:
$form = $this->getComponent('registrationForm');
// alternative syntax: $form = $this['registrationForm'];
Individual form controls are also components, so you can access them in the same way:
$input = $form->getComponent('name'); // or $input = $form['name'];
$button = $form->getComponent('send'); // or $button = $form['send'];
Controls are removed using unset:
unset($form['name']);
Validation Rules
The word valid was mentioned, but the form doesn't have any validation rules yet. Let's fix that.
The name will be mandatory, so we mark it using the setRequired() method. Its argument is the text of the error
message displayed if the user doesn't fill in the name. If the argument is omitted, a default error message is used.
$form->addText('name', 'Name:')
	->setRequired('Please enter your name.');
Try submitting the form without filling in the name, and you'll see an error message displayed, and the browser or server will reject it until you fill in the field.
At the same time, you can't cheat the system by entering only spaces in the field, for example. No way. Nette automatically trims leading and trailing whitespace. Try it out. It's something you should always do with every single-line input, but it's often forgotten. Nette does it automatically. (You can try to fool the form and send a multi-line string as the name. Even here, Nette won't be tricked, and line breaks will be converted to spaces.)
The form is always validated on the server side, but JavaScript validation is also generated, which runs instantly, and the
user learns about the error immediately, without needing to submit the form to the server. This is handled by the
netteForms.js script. Include it in your layout template:
<script src="https://unpkg.com/nette-forms@3"></script>
If you look at the source code of the page with the form, you might notice that Nette wraps required controls in elements with
the CSS class required. Try adding the following stylesheet to your template, and the ‘Name’ label will be red.
This elegantly highlights required fields for users:
<style>
.required label { color: maroon }
</style>
We add further validation rules using the addRule() method. The first parameter is the rule, the second is again
the text of the error message, and an argument for the validation rule may follow. What does that mean?
Let's extend the form with a new optional field ‘age’, which must be an integer (addInteger()) and also
within an allowed range ($form::Range). Here we will use the third parameter of the addRule() method to
pass the required range to the validator as a pair [min, max]:
$form->addInteger('age', 'Age:')
	->addRule($form::Range, 'Age must be between 18 and 120.', [18, 120]);
If the user doesn't fill in the field, the validation rules will not be checked, as the element is optional.
This creates room for a small refactoring. In the error message and the third parameter, the numbers are duplicated, which is
not ideal. If we were creating multilingual forms and the
message containing numbers were translated into multiple languages, changing the values would become difficult. For this reason,
placeholders %d can be used, and Nette will substitute the values:
->addRule($form::Range, 'Age must be between %d and %d years.', [18, 120]);
Let's return to the password control, make it required as well, and also verify the minimum password length
($form::MinLength), again using a placeholder in the message:
$form->addPassword('password', 'Password:')
	->setRequired('Pick a password')
	->addRule($form::MinLength, 'Your password must be at least %d characters long.', 8);
Let's add another field passwordVerify to the form, where the user enters the password again for confirmation.
Using validation rules, we check if both passwords are the same ($form::Equal). As the argument, we provide a
reference to the first password using square brackets:
$form->addPassword('passwordVerify', 'Password again:')
	->setRequired('Fill your password again to check for typo')
	->addRule($form::Equal, 'Passwords do not match.', $form['password'])
	->setOmitted();
Using setOmitted(), we marked a control whose value we don't actually care about and which exists only for
validation purposes. Its value is not passed to $data.
With this, we have a fully functional form with validation in both PHP and JavaScript. Nette's validation capabilities are much broader; conditions can be created, parts of the page can be shown or hidden based on them, etc. You will learn everything in the chapter on form validation.
Default Values
We commonly set default values for form controls:
$form->addEmail('email', 'Email')
	->setDefaultValue($lastUsedEmail);
It's often useful to set default values for all controls simultaneously. For example, when the form is used for editing records. We read the record from the database and set the default values:
// $row = ['name' => 'John', 'age' => '33', /* ... */];
$form->setDefaults($row);
Call setDefaults() after defining the controls.
On an already submitted form, setDefaults() has no effect – it won't overwrite what the user filled in, so it
is safe to call it unconditionally in the form factory. If you need to force the values even after submission, use
setValues() instead.
Rendering the Form
By default, the form is rendered as a table. Individual controls adhere to basic web accessibility rules – all labels are
written as <label> elements and associated with their respective form controls. Clicking on the label
automatically focuses the cursor in the form field.
We can set arbitrary HTML attributes for each control. For example, add a placeholder:
$form->addInteger('age', 'Age:')
	->setHtmlAttribute('placeholder', 'Please fill in the age');
There are truly many ways to render a form, so a separate chapter on rendering is dedicated to it.
Mapping to Classes
Let's return to the formSucceeded() method, which receives the submitted data in the second parameter
$data as an ArrayHash object (or stdClass). Because it's a generic class, similar to
stdClass, we lack certain conveniences when working with it, such as property autocompletion in editors or static
code analysis. This could be solved by having a specific class for each form, whose properties represent the individual
controls. E.g.:
class RegistrationFormData
{
	public string $name;
	public ?int $age;
	public string $password;
}
Alternatively, you can use a constructor:
class RegistrationFormData
{
	public function __construct(
		public string $name,
		public ?int $age,
		public string $password,
	) {
	}
}
Properties of the data class can also be enums, and they will be automatically mapped.
How do we tell Nette to return data as objects of this class? Easier than you might think. Simply specify the class as the type
of the $data parameter in the handler method:
public function formSucceeded(Form $form, RegistrationFormData $data): void
{
	// $data is an instance of RegistrationFormData
	$name = $data->name;
	// ...
}
You can also specify array as the type, and then the data will be passed as an array.
Similarly, you can use the getValues() method, passing the class name or an object to hydrate as a parameter:
$data = $form->getValues(RegistrationFormData::class);
$name = $data->name;
If you need to read the values before the form is validated – typically inside an onValidate handler – use
the getUntrustedValues() method instead. It accepts the same parameters as getValues(), but returns the
submitted values without guaranteeing they have passed validation.
If the forms have a multi-level structure composed of containers, create a separate class for each:
$form = new Form;
$person = $form->addContainer('person');
$person->addText('firstName');
/* ... */

class PersonFormData
{
	public string $firstName;
	public string $lastName;
}

class RegistrationFormData
{
	public PersonFormData $person;
	public ?int $age;
	public string $password;
}
The mapping then infers from the type of the $person property that it should map the container to the
PersonFormData class. If the property were to contain an array of containers, specify the type array and
pass the class to be mapped directly to the container:
$person->setMappedType(PersonFormData::class);
You can generate a proposal for the form's data class using the
Nette\Forms\Blueprint::dataClass($form) method, which prints it to the browser page. Then, simply click to select and
copy the code into your project.
Multiple Submit Buttons
If the form has more than one button, we usually need to distinguish which one was pressed. We can create a separate handler
function for each button. Set it as a handler for the onClick event:
$form->addSubmit('save', 'Save')
	->onClick[] = $this->saveButtonPressed(...);

$form->addSubmit('delete', 'Delete')
	->onClick[] = $this->deleteButtonPressed(...);
A handler can also be passed to the button directly as the third argument of the addSubmit()
method.
These handlers are called only if the form is validly filled (unless validation is disabled for the button), just like the
onSuccess event. The difference is that the first parameter passed can be the submit button object instead of the
form, depending on the type hint you specify:
private function saveButtonPressed(Nette\Forms\Controls\Button $button, $data)
{
	$form = $button->getForm();
	// ...
}
When the form is submitted by pressing the Enter key, it is treated as if it were submitted by the first submit button.
Event onAnchor
When you build a form in a factory method (like createComponentRegistrationForm), it doesn't yet know if it has
been submitted or with what data. However, there are cases where we need to know the submitted values, perhaps the
form's appearance depends on them, or they are needed for dependent select boxes, etc.
Therefore, you can have the code that builds the form called only when it is ‘anchored,’ meaning it is already connected to
the presenter and knows its submitted data. Place such code in the $onAnchor array:
$country = $form->addSelect('country', 'Country:', $this->model->getCountries());
$city = $form->addSelect('city', 'City:');

$form->onAnchor[] = function () use ($country, $city) {
	// this function will be called when the form knows data it was submitted with
	// so you can use the getValue() method
	$val = $country->getValue();
	$city->setItems($val ? $this->model->getCities($val) : []);
};
Vulnerability Protection
Nette Framework places great emphasis on security and therefore meticulously ensures the security of forms. It does this completely transparently and requires no manual setup.
Besides protecting forms against attacks like Cross-Site Scripting (XSS) and Cross-Site Request Forgery (CSRF), it performs many small security measures that you no longer need to think about.
For example, it filters all control characters from inputs and checks the validity of UTF-8 encoding, ensuring the data from the form is always clean. For select boxes and radio lists, it verifies that the selected items were actually among the offered ones and that no forgery occurred. We've already mentioned that for single-line text inputs, it replaces end-of-line characters that an attacker might send with spaces. For multi-line inputs, it normalizes end-of-line characters. And so on.
Nette handles security risks for you that many programmers aren't even aware exist.
The mentioned CSRF attack involves an attacker luring a victim to a page that silently executes a request in the victim's browser to the server where the victim is logged in. The server then believes the request was made by the victim willingly. Therefore, Nette rejects POST forms submitted from a foreign origin; even a different subdomain of the same site counts as foreign. If you need to allow submissions from another origin, disable the protection with:
$form->allowCrossOrigin(); // WARNING! Disables protection completely!
This disables the protection for any origin, though. To allow only specific origins, disable the protection and verify the
Origin header yourself against your own allowlist.
The protection relies on the browser's Sec-Fetch-Site header (Fetch Metadata), which the browser sends
automatically and which cannot be spoofed even with an XSS vulnerability. For older browsers without support for them, a fallback
SameSite cookie applies, which a Nette application sets automatically. The article The browser finally solves CSRF describes it in detail.
The earlier protection using an authorization token stored in the session, activated by
$form->addProtection(), is no longer needed and is deprecated since version 3.3.
Using One Form in Multiple Presenters
If you need to use the same form in multiple presenters, we recommend creating a factory for it, which you then inject into the
presenters. A suitable location for such a class is, for example, the app/Forms directory.
The factory class might look like this:
use Nette\Application\UI\Form;

class SignInFormFactory
{
	public function create(): Form
	{
		$form = new Form;
		$form->addText('name', 'Name:');
		$form->addSubmit('send', 'Log in');
		return $form;
	}
}
We request the class to produce the form in the component factory method within the presenter:
public function __construct(
	private SignInFormFactory $formFactory,
) {
}

protected function createComponentSignInForm(): Form
{
	$form = $this->formFactory->create();
	// we can change the form, here for example we change the label on the button
	$form['send']->setCaption('Continue');
	$form->onSuccess[] = $this->signInFormSuceeded(...); // and add handler
	return $form;
}
The form processing handler can also be provided by the factory itself:
use Nette\Application\UI\Form;

class SignInFormFactory
{
	public function create(): Form
	{
		$form = new Form;
		$form->addText('name', 'Name:');
		$form->addSubmit('send', 'Log in');
		$form->onSuccess[] = function (Form $form, $data): void {
			// we process our submitted form here
		};
		return $form;
	}
}
So, we've covered a quick introduction to forms in Nette. Try looking in the examples directory in the distribution for more inspiration.