Comments
The blog has been deployed, we’ve written some very interesting blog posts and published them using Adminer. People are reading our blog and are very enthusiastic about it. We receive many emails with praise every day. But what good is all this praise if it's only in our email and no one else can read it? Wouldn't it be better if readers could comment directly on the articles, so everyone could see how amazing we are?
Let's implement comments.
Creating a New Table
Let's fire up Adminer again and create a comments table with these columns:
idint, check autoincrement (AI)post_id, foreign key referencing thepoststablenamevarchar, length 255emailvarchar, length 255contenttextcreated_attimestamp
The table should look something like this:
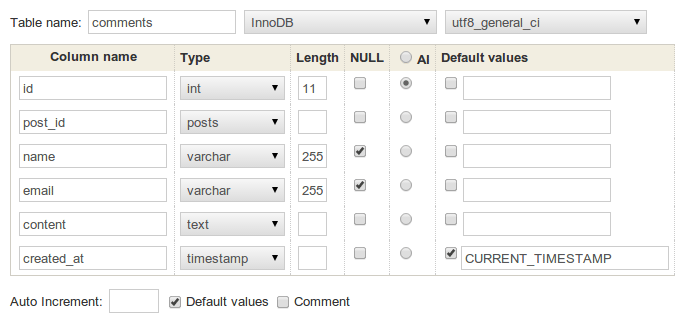
Remember to use the InnoDB storage engine again.
CREATE TABLE `comments` (
	`id` int NOT NULL AUTO_INCREMENT PRIMARY KEY,
	`post_id` int NOT NULL,
	`name` varchar(250) NOT NULL,
	`email` varchar(250) NOT NULL,
	`content` text NOT NULL,
	`created_at` timestamp NOT NULL DEFAULT CURRENT_TIMESTAMP,
	FOREIGN KEY (`post_id`) REFERENCES `posts` (`id`)
) ENGINE=InnoDB CHARSET=utf8;
Form for Commenting
First, we need to create a form that allows users to comment on posts. Nette Framework has excellent support for forms. We can configure them in the presenter and render them in the template.
Nette Framework uses the concept of components. A component is a reusable class or piece of code that can be
attached to another component. Even a presenter is a component. Each component is created using a factory method. Let's create a
factory for the comment form in the PostPresenter.
protected function createComponentCommentForm(): Form
{
	$form = new Form; // means Nette\Application\UI\Form

	$form->addText('name', 'Your name:')
		->setRequired();

	$form->addEmail('email', 'Email:');

	$form->addTextArea('content', 'Comment:')
		->setRequired();

	$form->addSubmit('send', 'Publish comment');

	return $form;
}
Let's explain this briefly. The first line creates a new instance of the Form component. The subsequent methods
attach HTML inputs to the form definition. ->addText renders as <input type="text" name="name">
with a <label>Your name:</label>. As you might guess, ->addTextArea attaches a
<textarea>, and ->addSubmit adds an <input type="submit">. There are many
similar methods, but these are sufficient for now. You can learn more in the
documentation.
Once the form component is defined in the presenter, we can render (display) it in the template. To do this, place the
{control} tag at the end of the template that displays a single post, in Post/show.latte. Since the
component is named commentForm (derived from the method name createComponentCommentForm), the tag will
look like this:
...
<h2>Post new comment</h2>

{control commentForm}
Now, if you view the detail page of a post, you will see the new comment form at the end.
Saving to Database
Have you tried filling out and submitting the form? You might have noticed that the form doesn't actually do anything yet. We need to attach a callback method that will save the submitted data.
Add the following line before the return statement in the factory method for the commentForm
component:
$form->onSuccess[] = $this->commentFormSucceeded(...);
This line means “after the form is successfully submitted, call the commentFormSucceeded method of the current
presenter”. This method doesn't exist yet, so let's create it:
private function commentFormSucceeded(\stdClass $data): void
{
	$id = $this->getParameter('id');

	$this->database->table('comments')->insert([
		'post_id' => $id,
		'name' => $data->name,
		'email' => $data->email,
		'content' => $data->content,
	]);

	$this->flashMessage('Thank you for your comment', 'success');
	$this->redirect('this');
}
You should place it right after the commentForm component factory.
The new method has one argument which is the instance of the form being submitted, created by the component factory. We receive
submitted values in $data. And then we insert the data into the database table comments.
There are two more method calls to explain. The redirect('this') method literally redirects back to the current
page. You should do this every time a form is submitted successfully and the callback operation has completed. Redirecting after
form submission also prevents the well-known “Would you like to submit the post data again?” message in the browser.
(Generally, after submitting a form using the POST method, you should always redirect to a GET
action.)
The flashMessage method is used to inform the user about the result of an operation. Since we are redirecting, the
message cannot be simply passed to the template and rendered directly. This method stores the message and makes it available on
the next page load. Flash messages are rendered in the main layout template app/Presentation/@layout.latte, looking
like this:
<div n:foreach="$flashes as $flash" n:class="flash, $flash->type">
	{$flash->message}
</div>
As we already know, flash messages are automatically passed to the template, so we don't need to think much about it; it just works. For more details, visit the documentation.
Rendering the Comments
This is one of those features you'll simply love. Nette Database has a great feature called Explorer. Remember how we intentionally created the database tables using the InnoDB engine? Adminer created what are called foreign keys, which save us a lot of work.
Nette Database Explorer uses these foreign keys to resolve relationships between tables. Knowing these relationships, it can automatically create database queries for you.
As you might recall, we passed the $post variable to the template in PostPresenter::renderShow().
Now, we want to iterate over all comments where the post_id column matches our $post->id. We can
achieve this by calling $post->related('comments'). Yes, it's that simple. Let's look at the final code:
public function renderShow(int $id): void
{
	...
	$this->template->post = $post;
	$this->template->comments = $post->related('comments')->order('created_at');
}
And the template:
...
<h2>Comments</h2>

<div class="comments">
	{foreach $comments as $comment}
		<p><b><a href="mailto:{$comment->email}" n:tag-if="$comment->email">
			{$comment->name}
		</a></b> said:</p>

		<div>{$comment->content}</div>
	{/foreach}
</div>
...
Notice the special n:tag-if attribute. You already know how n:attributes work. If you prefix the
attribute with tag-, the functionality applies only to the HTML tag itself, not its content. This allows us to make
the commenter's name a link only if they provided their email. These two lines produce identical results:
<strong n:tag-if="$important"> Hello there! </strong>

{if $important}<strong>{/if} Hello there! {if $important}</strong>{/if}